In my previous post I’ve introduced what needs to be done in order to be able to insert and update data in ADF Desktop integration (ADFDI) table component:
- How to insert new record in table component of ADF Desktop integration (ADFDI) Excel workbook ?
- How to update a record in table component of ADF Desktop Integration (ADFDI) Excel workbook ?
If you’re done with it and now want to delete a record, here is how it works. Its different than insert, you can not just delete spreadsheet row by using excel means. It does not work like that. Instead, you need to mark row for deletion, and then perform action to process that row. You can either do it with separate dedicated button or extend general Upload Data action set by adding delete action. I’m going to show you how to proceed with latter option. So, assuming you are already familiar and have an excel workbook which can insert data, you need very little effort to enable deletion as well. Need to:
- Add delete action binding to page definition file

- Modify properties of ADFDI table component by enabling deletion.
- Open properties of table component
- Expand RowActions
- Set DeleteRowEnabled to true
- Specify Delete action binding for DeleteRowActionId

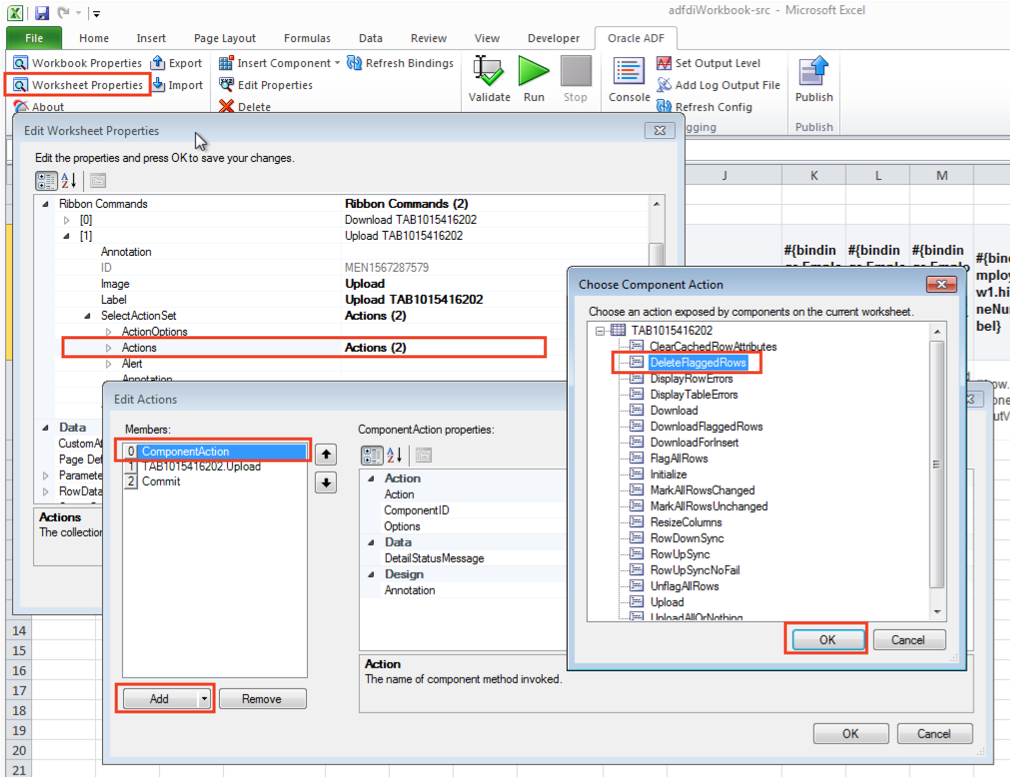
- Add DeleteFlaggedRows action to action set covered by Upload Data
- Open Worksheet Properties
- Expand Ribbon Commands -> Upload TAB1015416202 -> SelectActionSet -> Actions
- Click on Add and select ComponentAction
- Drill into Action in the right-hand tab and select DeleteFlaggedRows. Move this action into first position in the list
- Confirm all screens
- Testing
- Run excel workbook
- Double click in column Flagged for the row you want to delete. Blue circle appears in the particular cell.
- Click Upload. Flagged row should disappear from the table.

Sample application can be downloaded here.
You might be also interested in:
- How to insert new record in table component of ADF Desktop integration (ADFDI) Excel workbook ?
- How to update a record in ADF Desktop Integration (ADFDI) Excel workbook table component?
- How to install ADF Desktop Integration (ADFDI) plugin?
- How to create ADF Desktop Integration (ADFDI) Excel workbook
- How to configure ADF Desktop Integration (ADFDI) worksheet to load data automatically on opening?
- How to pass a parameter to ADF Desktop Integration (ADFDI) excel workbook?
For more information, you can check Oracle documentation – Working with ADF Desktop Integration Table-Type Components.
ADF Version 12.2.1.0.0